The vtiger WooCommerce integration enables seamless Real-time synchronization between your WooCommerce store and vtiger crm opensource. WooCommerce Integration with Vtiger ensures that your sales, customers, and order data flow automatically between the WooCommerce store and vtiger crm, eliminating manual data entry, reducing errors, and improving operational efficiency.
Why use WooCommerce integration with vtiger crm opensource
Centralised data management: Access and manage your WooCommerce business contacts, products, and sales orders directly within vtiger vtiger.
Data Accuracy: prevent record duplication and manual entry errors by maintaining a single, synchronized source of data across both platforms.
360 customer view: view complete order history, support tickets, invoices, and communication logs, all linked to the customer’s vtiger record for a comprehensive profile.
Operational efficiency: save time and streamline your workflow by managing customer interactions, inventory updates, and order processing from a single platform.
Vtiger WooCommerce Integration Dashboard View
Supported modules
The vtiger WooCommerce integration is available for the following modules:
- Product
- Sales order
- Contact
Sync direction capabilities
Sync WooCommerce to vtiger crm
Sync Vtiger crm to WooCommerce
Sync both ways
Prerequisites
After purchasing the Vtiger WooCommerce integration plugin, you will receive a confirmation email containing two separate download links:
- Woocommerce connector WordPress plugin
- Woocommerce connector vtiger crm plugin
Both plugins are required for the integration to function properly.
Installation requirement
- Download and install the WordPress plugin on your WooCommerce website
- Download and install the vtiger crm plugin in your vtiger instance.
Step 1: Connect vtiger opensource with WooCommerce
WooCommerce Integration with Vtiger To Connect vtiger opensource with WooCommerce Follow these steps,
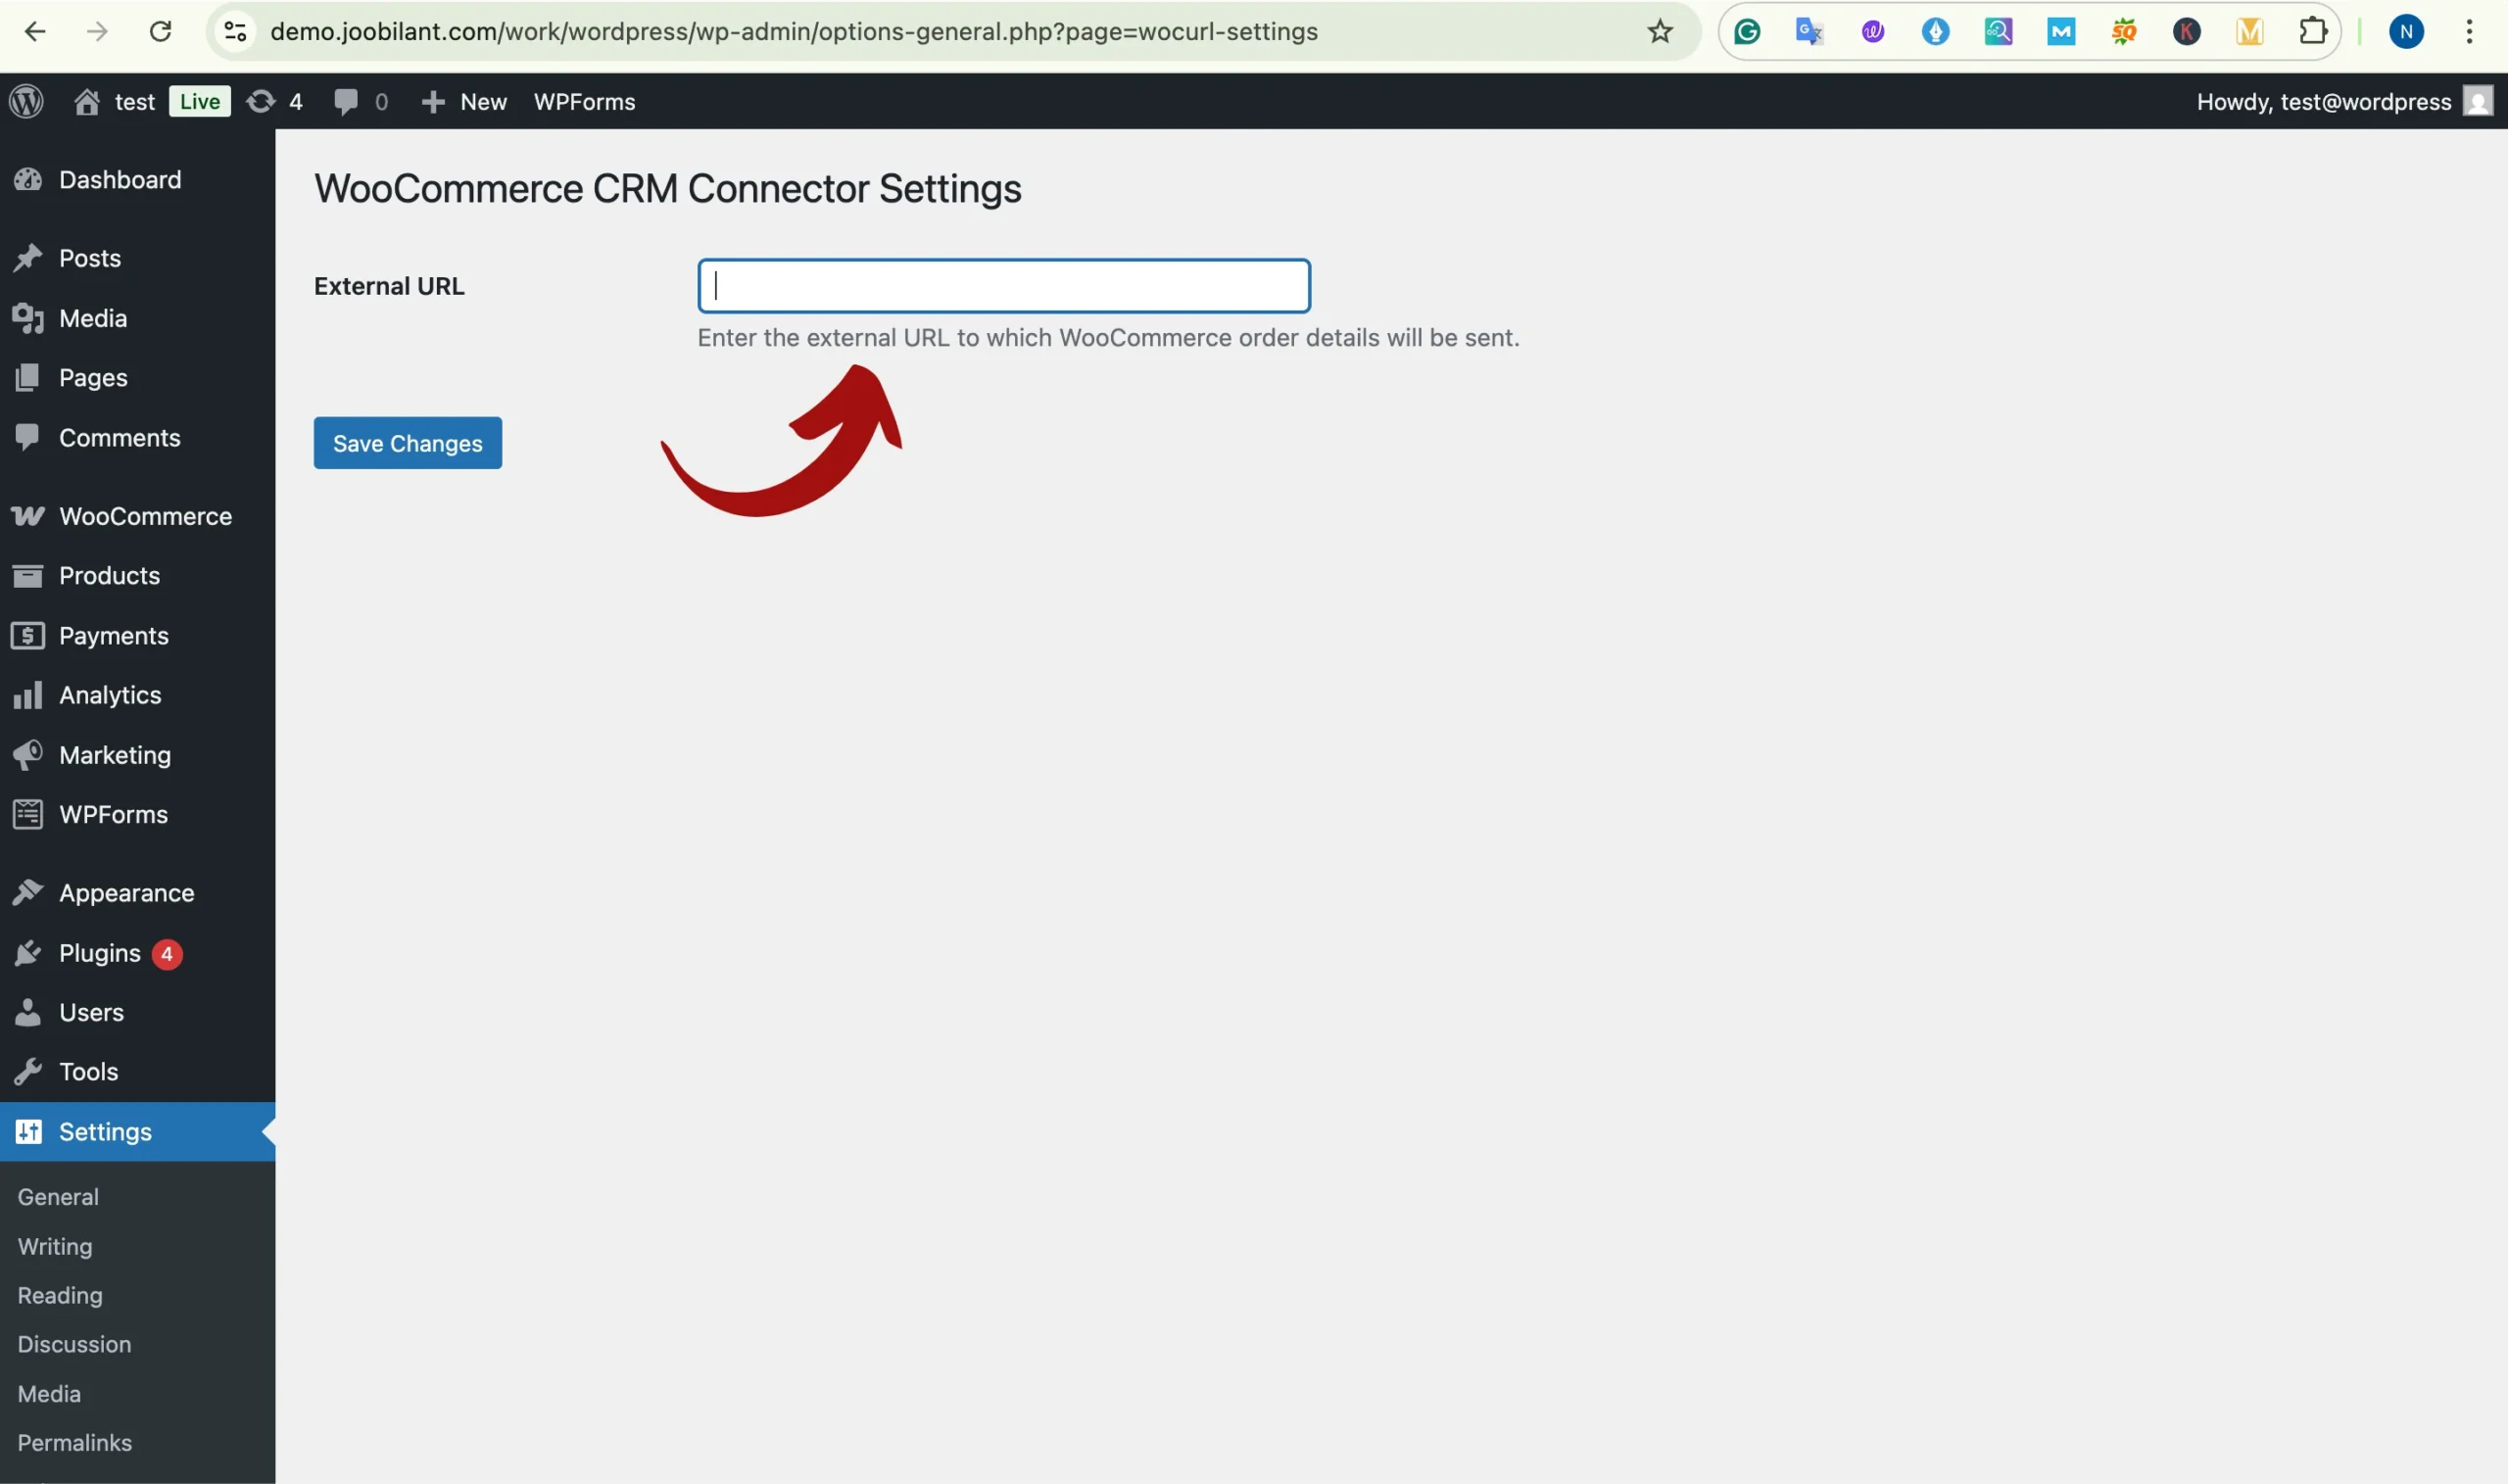
- Loginto your WordPress admin panel
- Navigate to settings from the left-hand menu
- Click on woocmmerce crm connector.
- In the configuration page, enter your vtiger crm url ( crm url path )
- Click save to store the configuration.
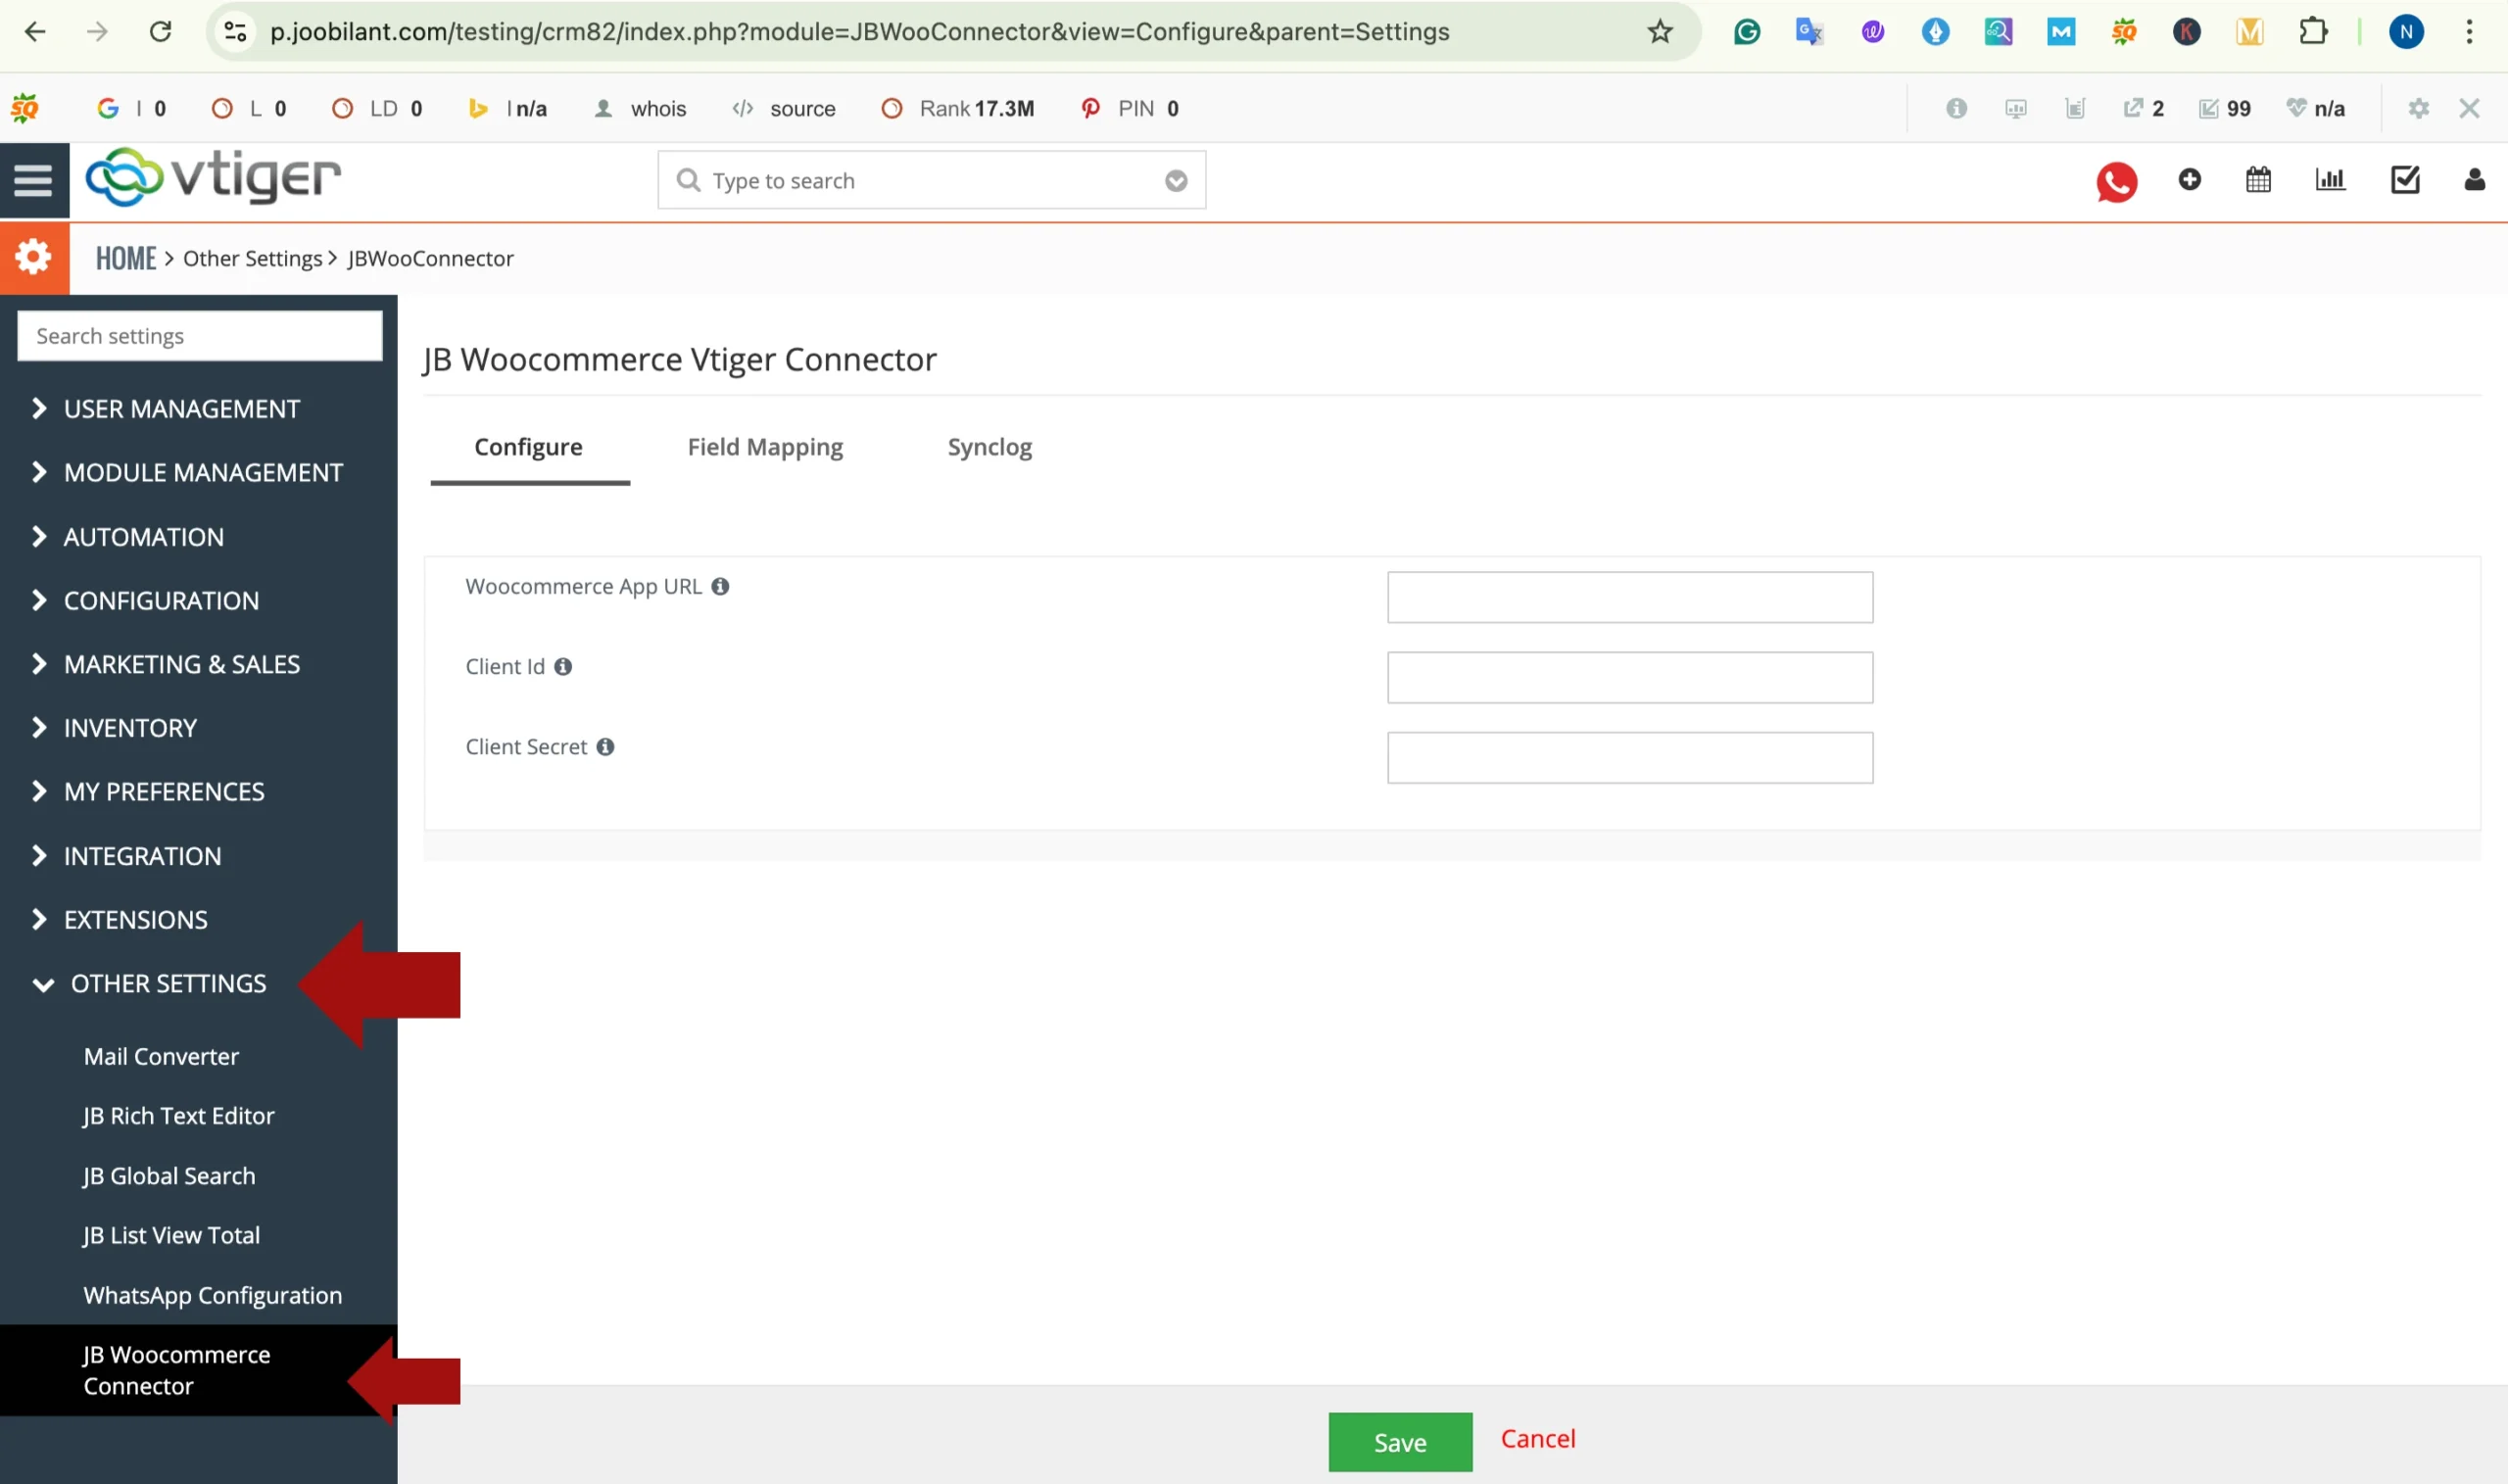
Step 2: Access the WooCommerce connector in vtiger crm
After completing the WordPress side configuration, you must configure the connector inside vtiger crm.
- Login to your vtiger crm
- Navigate to
Settings > crm settings > other settings
- Click on the JB WooCommerce connector
This will open the integration configuration panel inside vtiger crm.
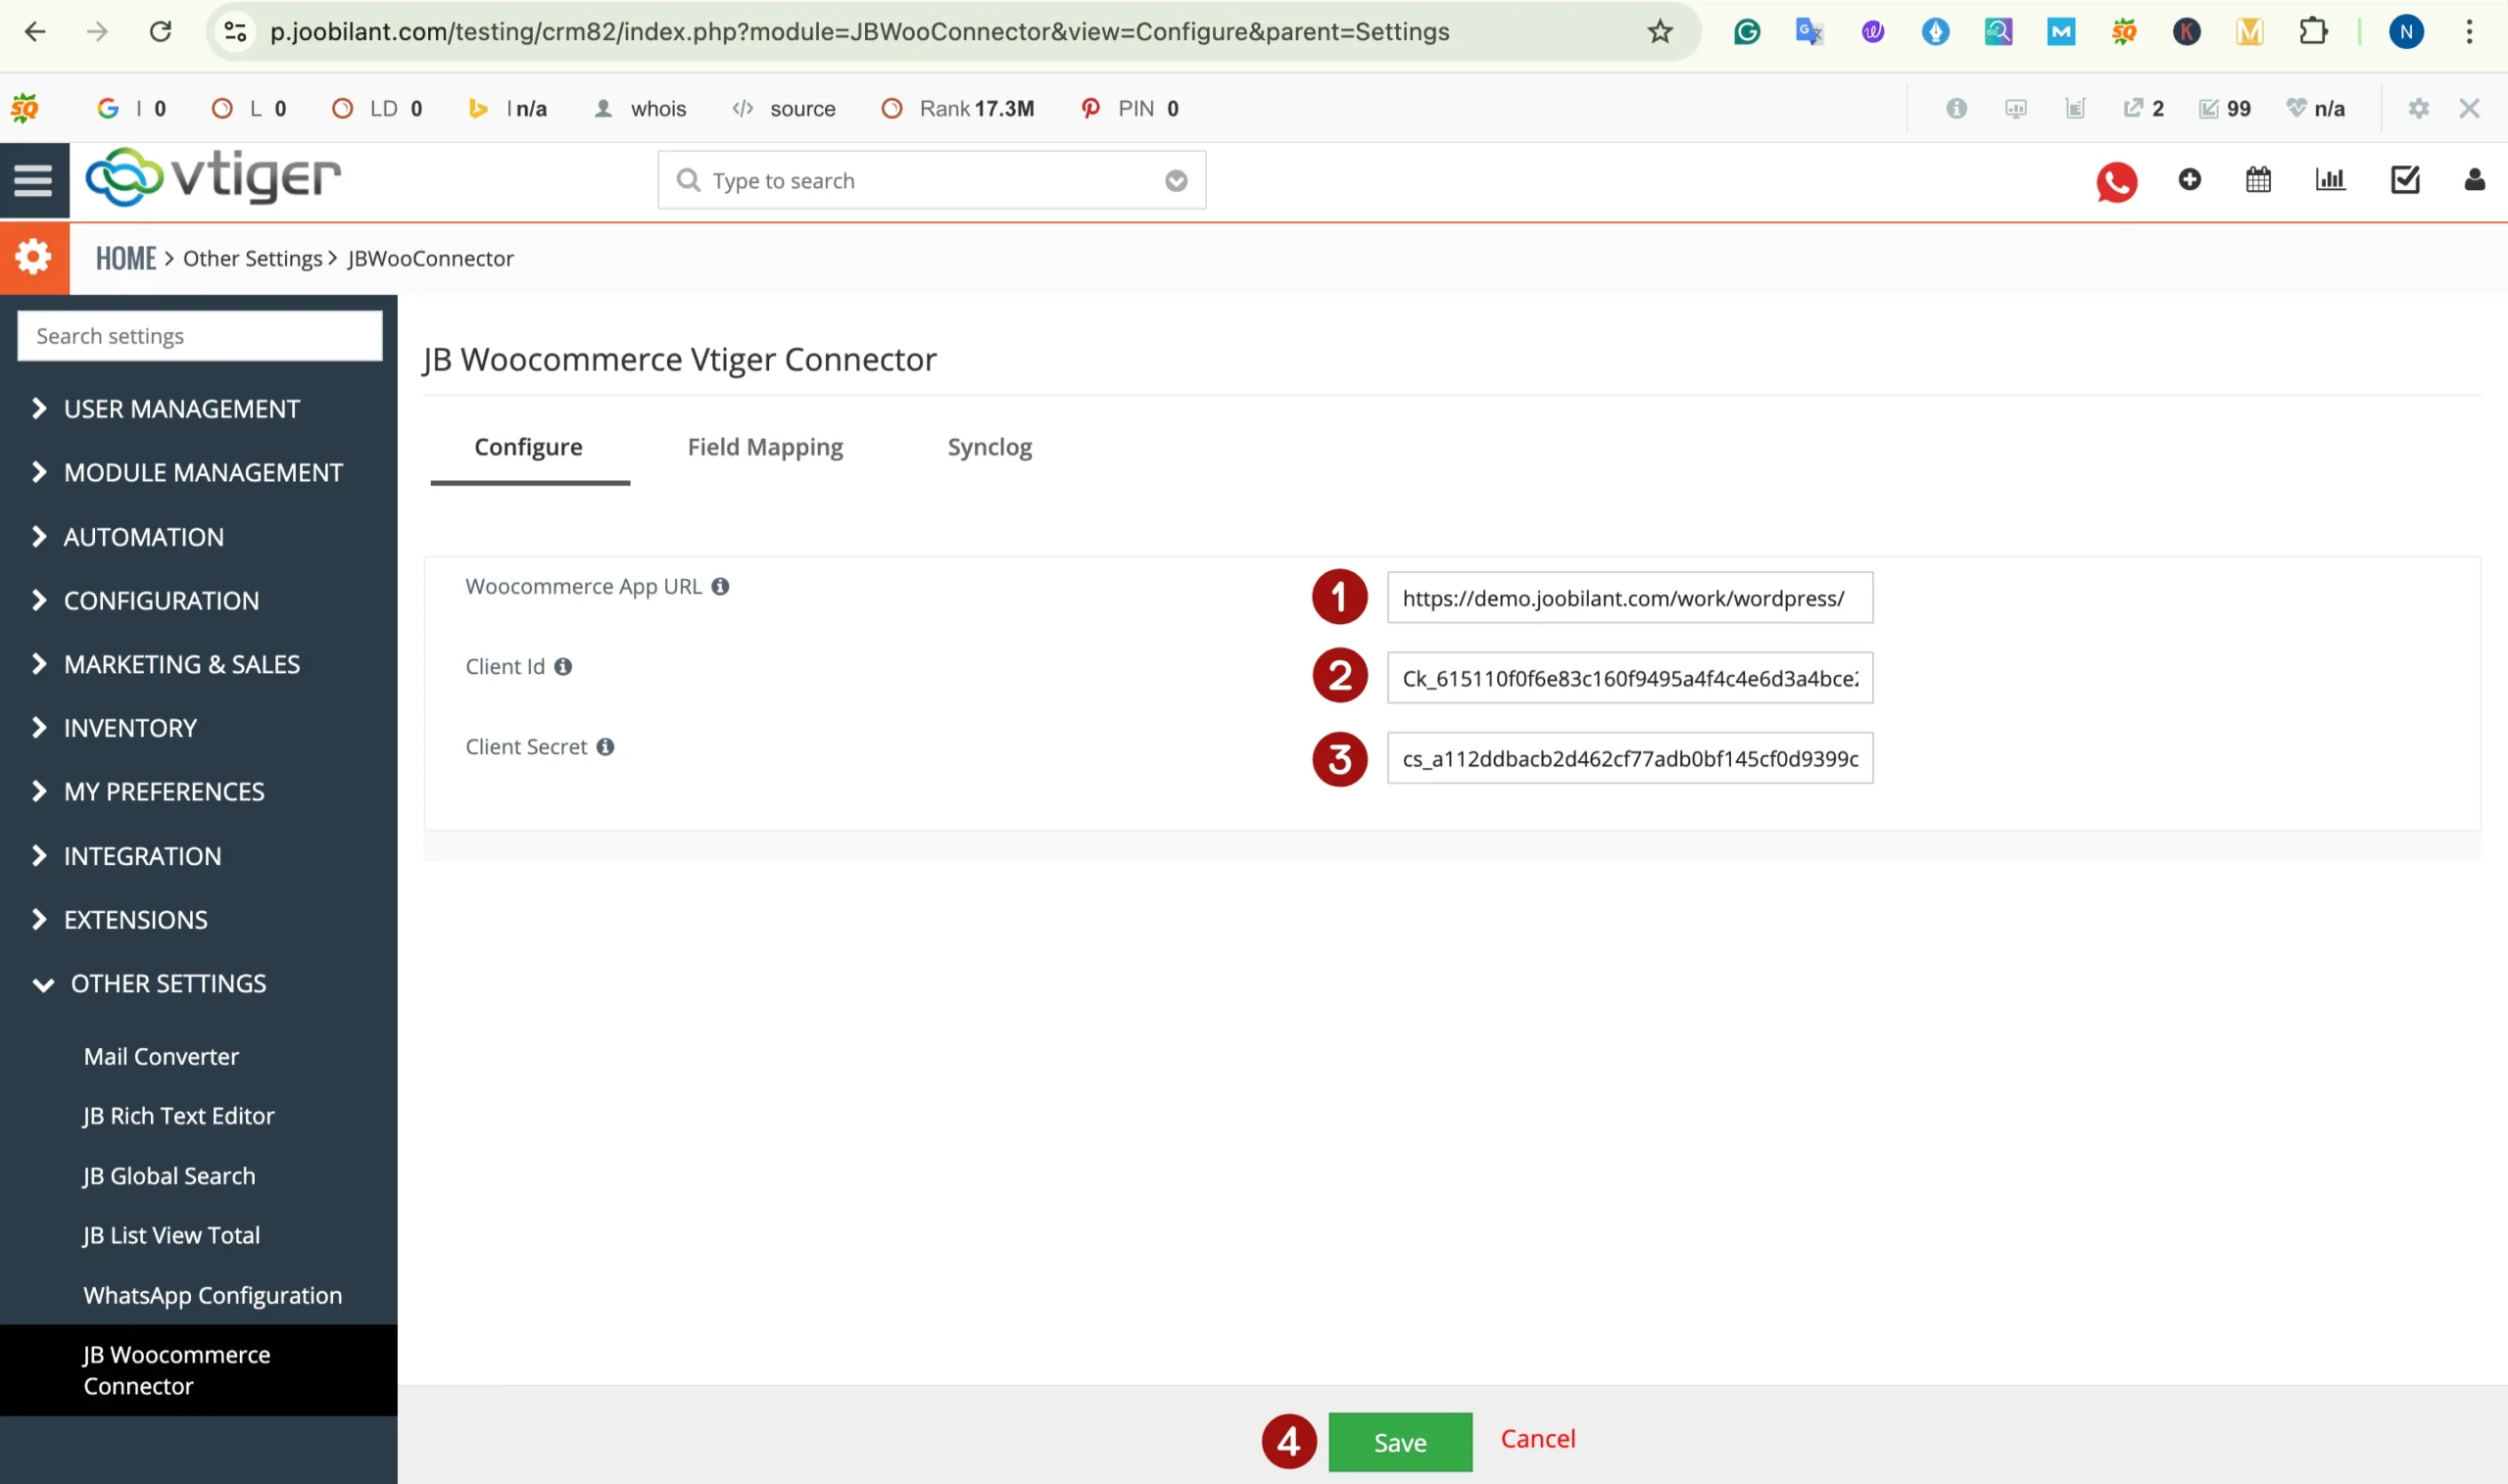
Step 3: Configure the WooCommerce Vtiger CRM Connector
To establish secure communication between
WooCommerce and vtiger crm you must enter your WooCommerce REST API Credentials.
Enter the following details in vtiger:
- Woocommerce app URL
- Client id
- Client secret
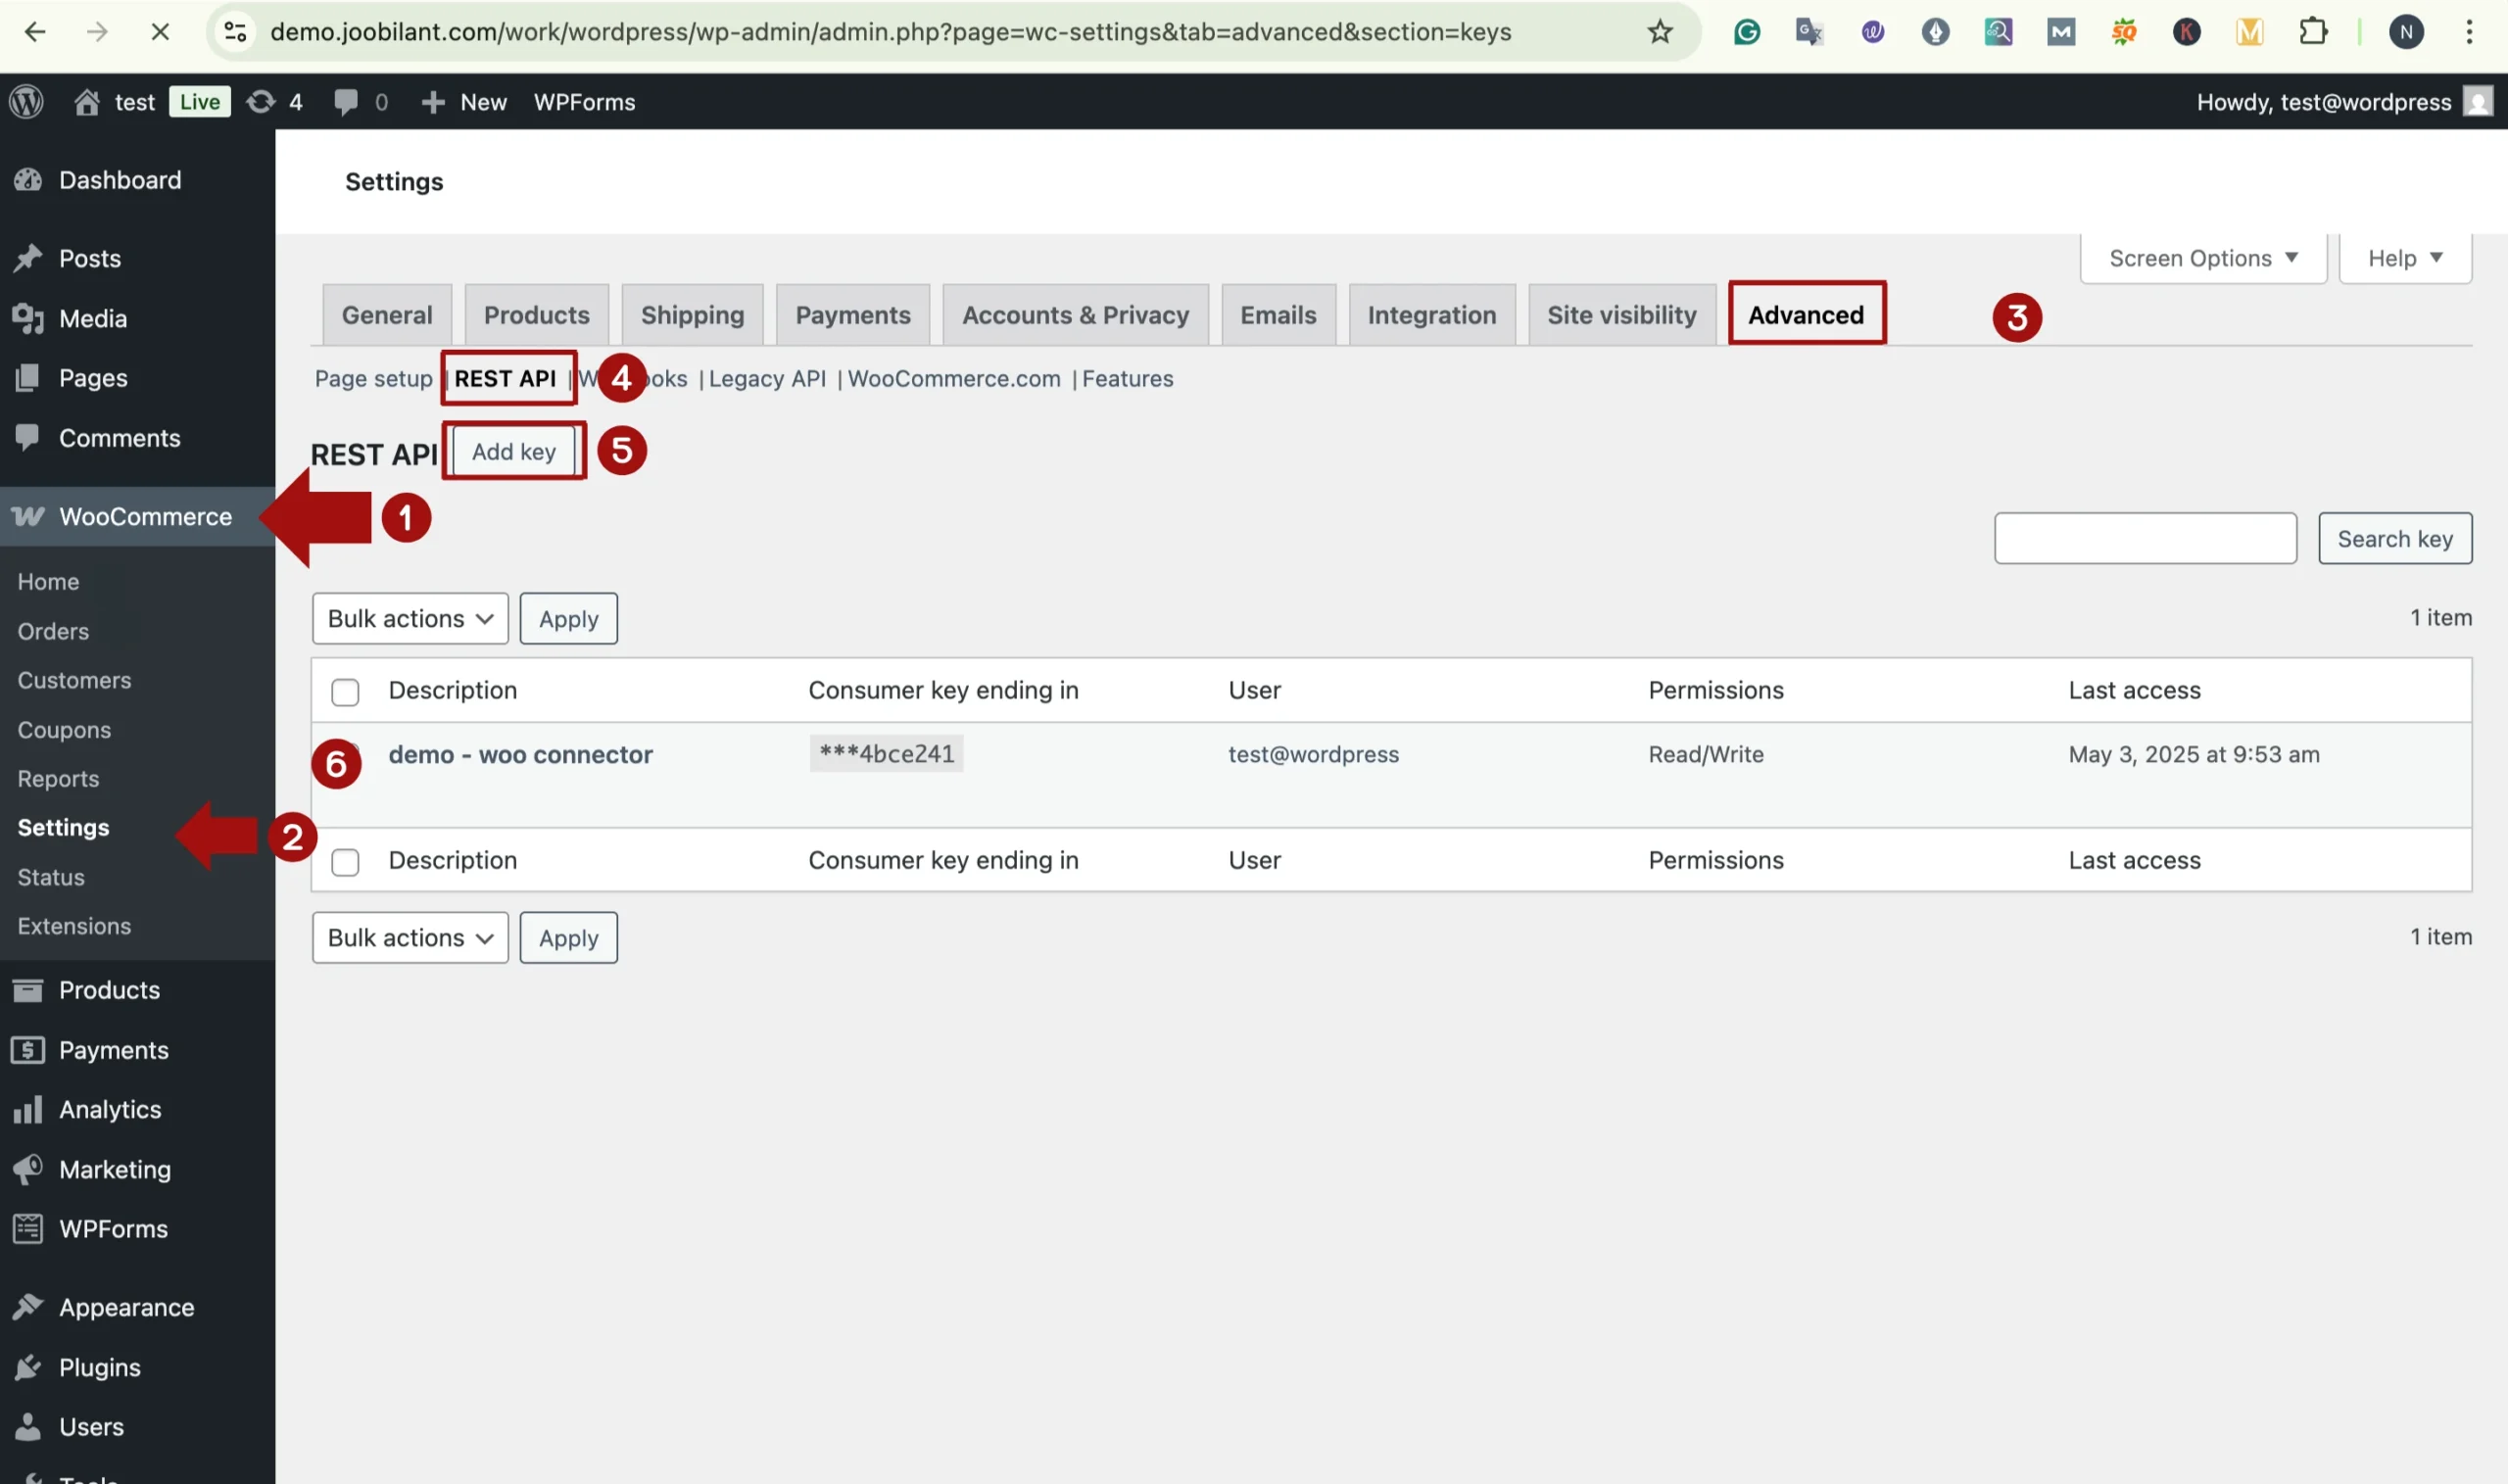
Where to find these credentials in WordPress
You can generate and retrieve these details from your WooCommerce store:
- Log in to your WordPress dashboard
- Navigate to:
Woocommerce > settings > advanced > REST API
- Create or view an api key.
- Copy the following:
Consumer key ( client id )
Consumer secret ( client secret )
Return to the JB Woocommerce connector page in vtiger crm and :
- Enter the WooCommerce app URL
- Paste client id
- Paste client secret
- Click save
Once the secure connection between WooCommerce and vtiger crm will be established, enabling data synchronisation.
Step 4: Enabling the connector & configuration sync direction
After completing the api configuration, the next step is to activate the ConnectCore and define the data synchronisation direction.
Within the field mapping section:
- Enable the WooCommerce connector.
- Select the preferred sync direction
(Customer and order data will sync from WooCommerce to vtiger)
(Data will sync for vtiger to WooCommerce)
(Data will be synchronized in both directions)
Choose the option that aligns with your business workflow and data management strategy.
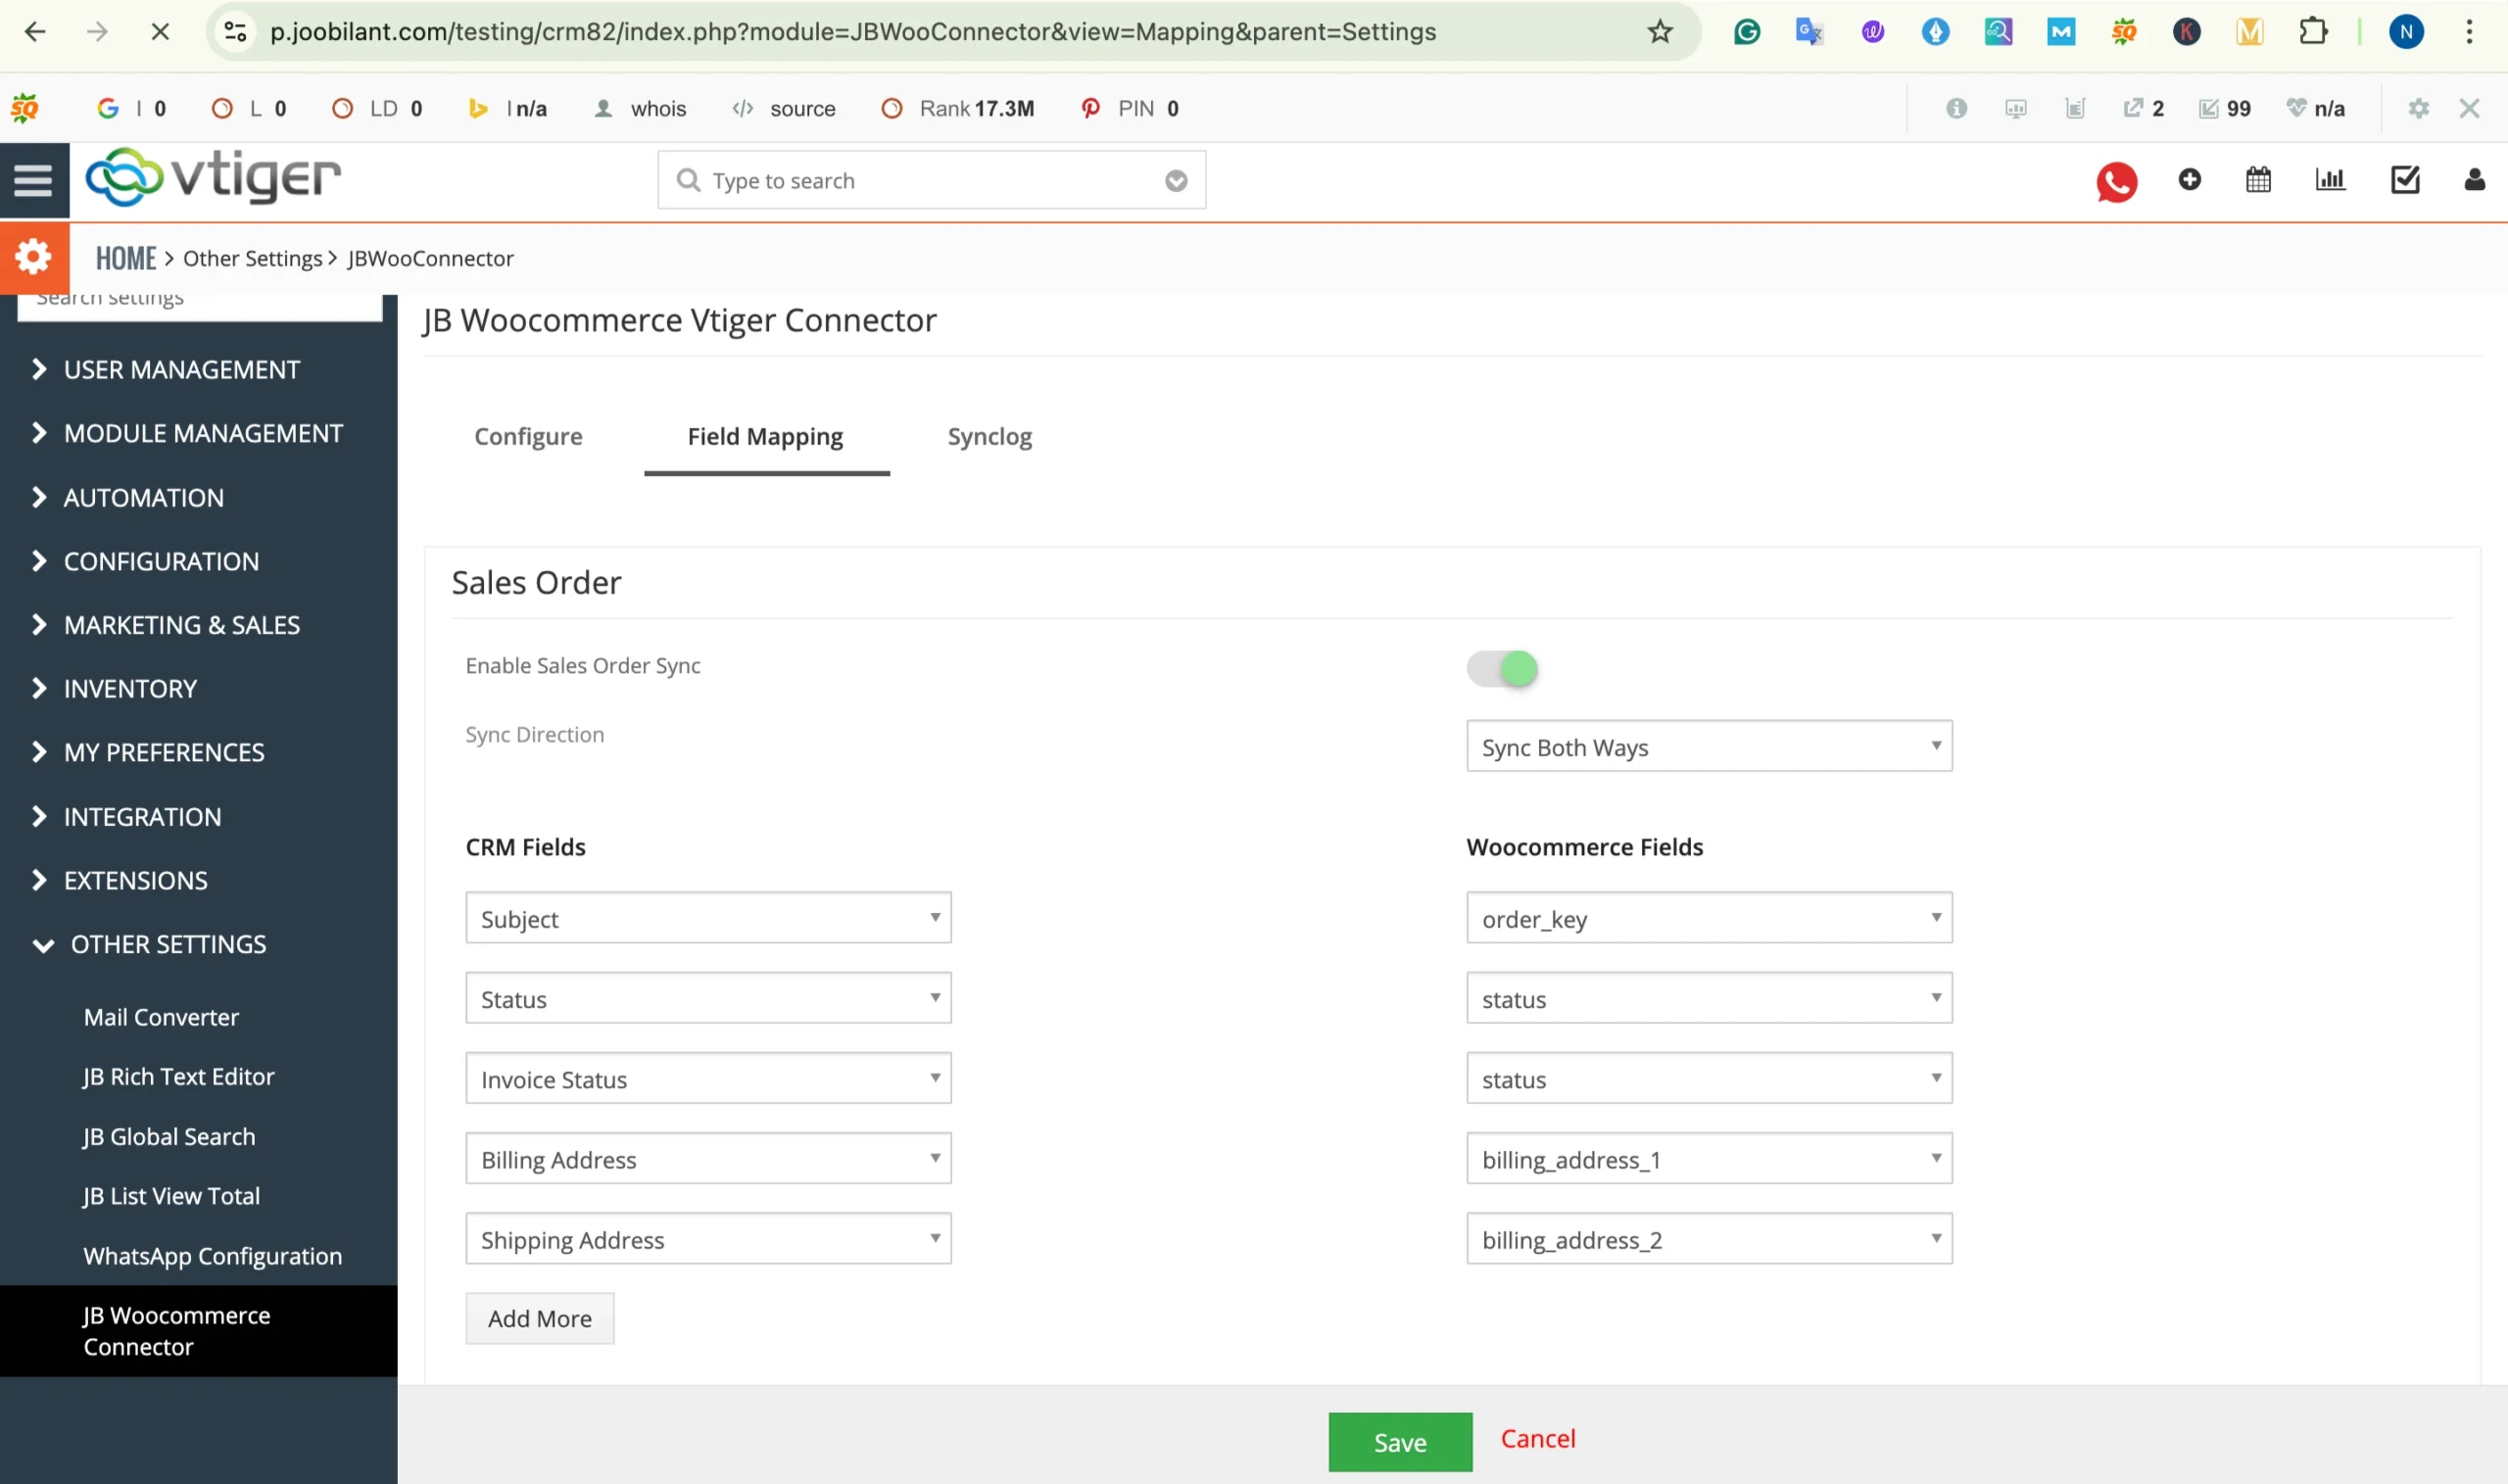
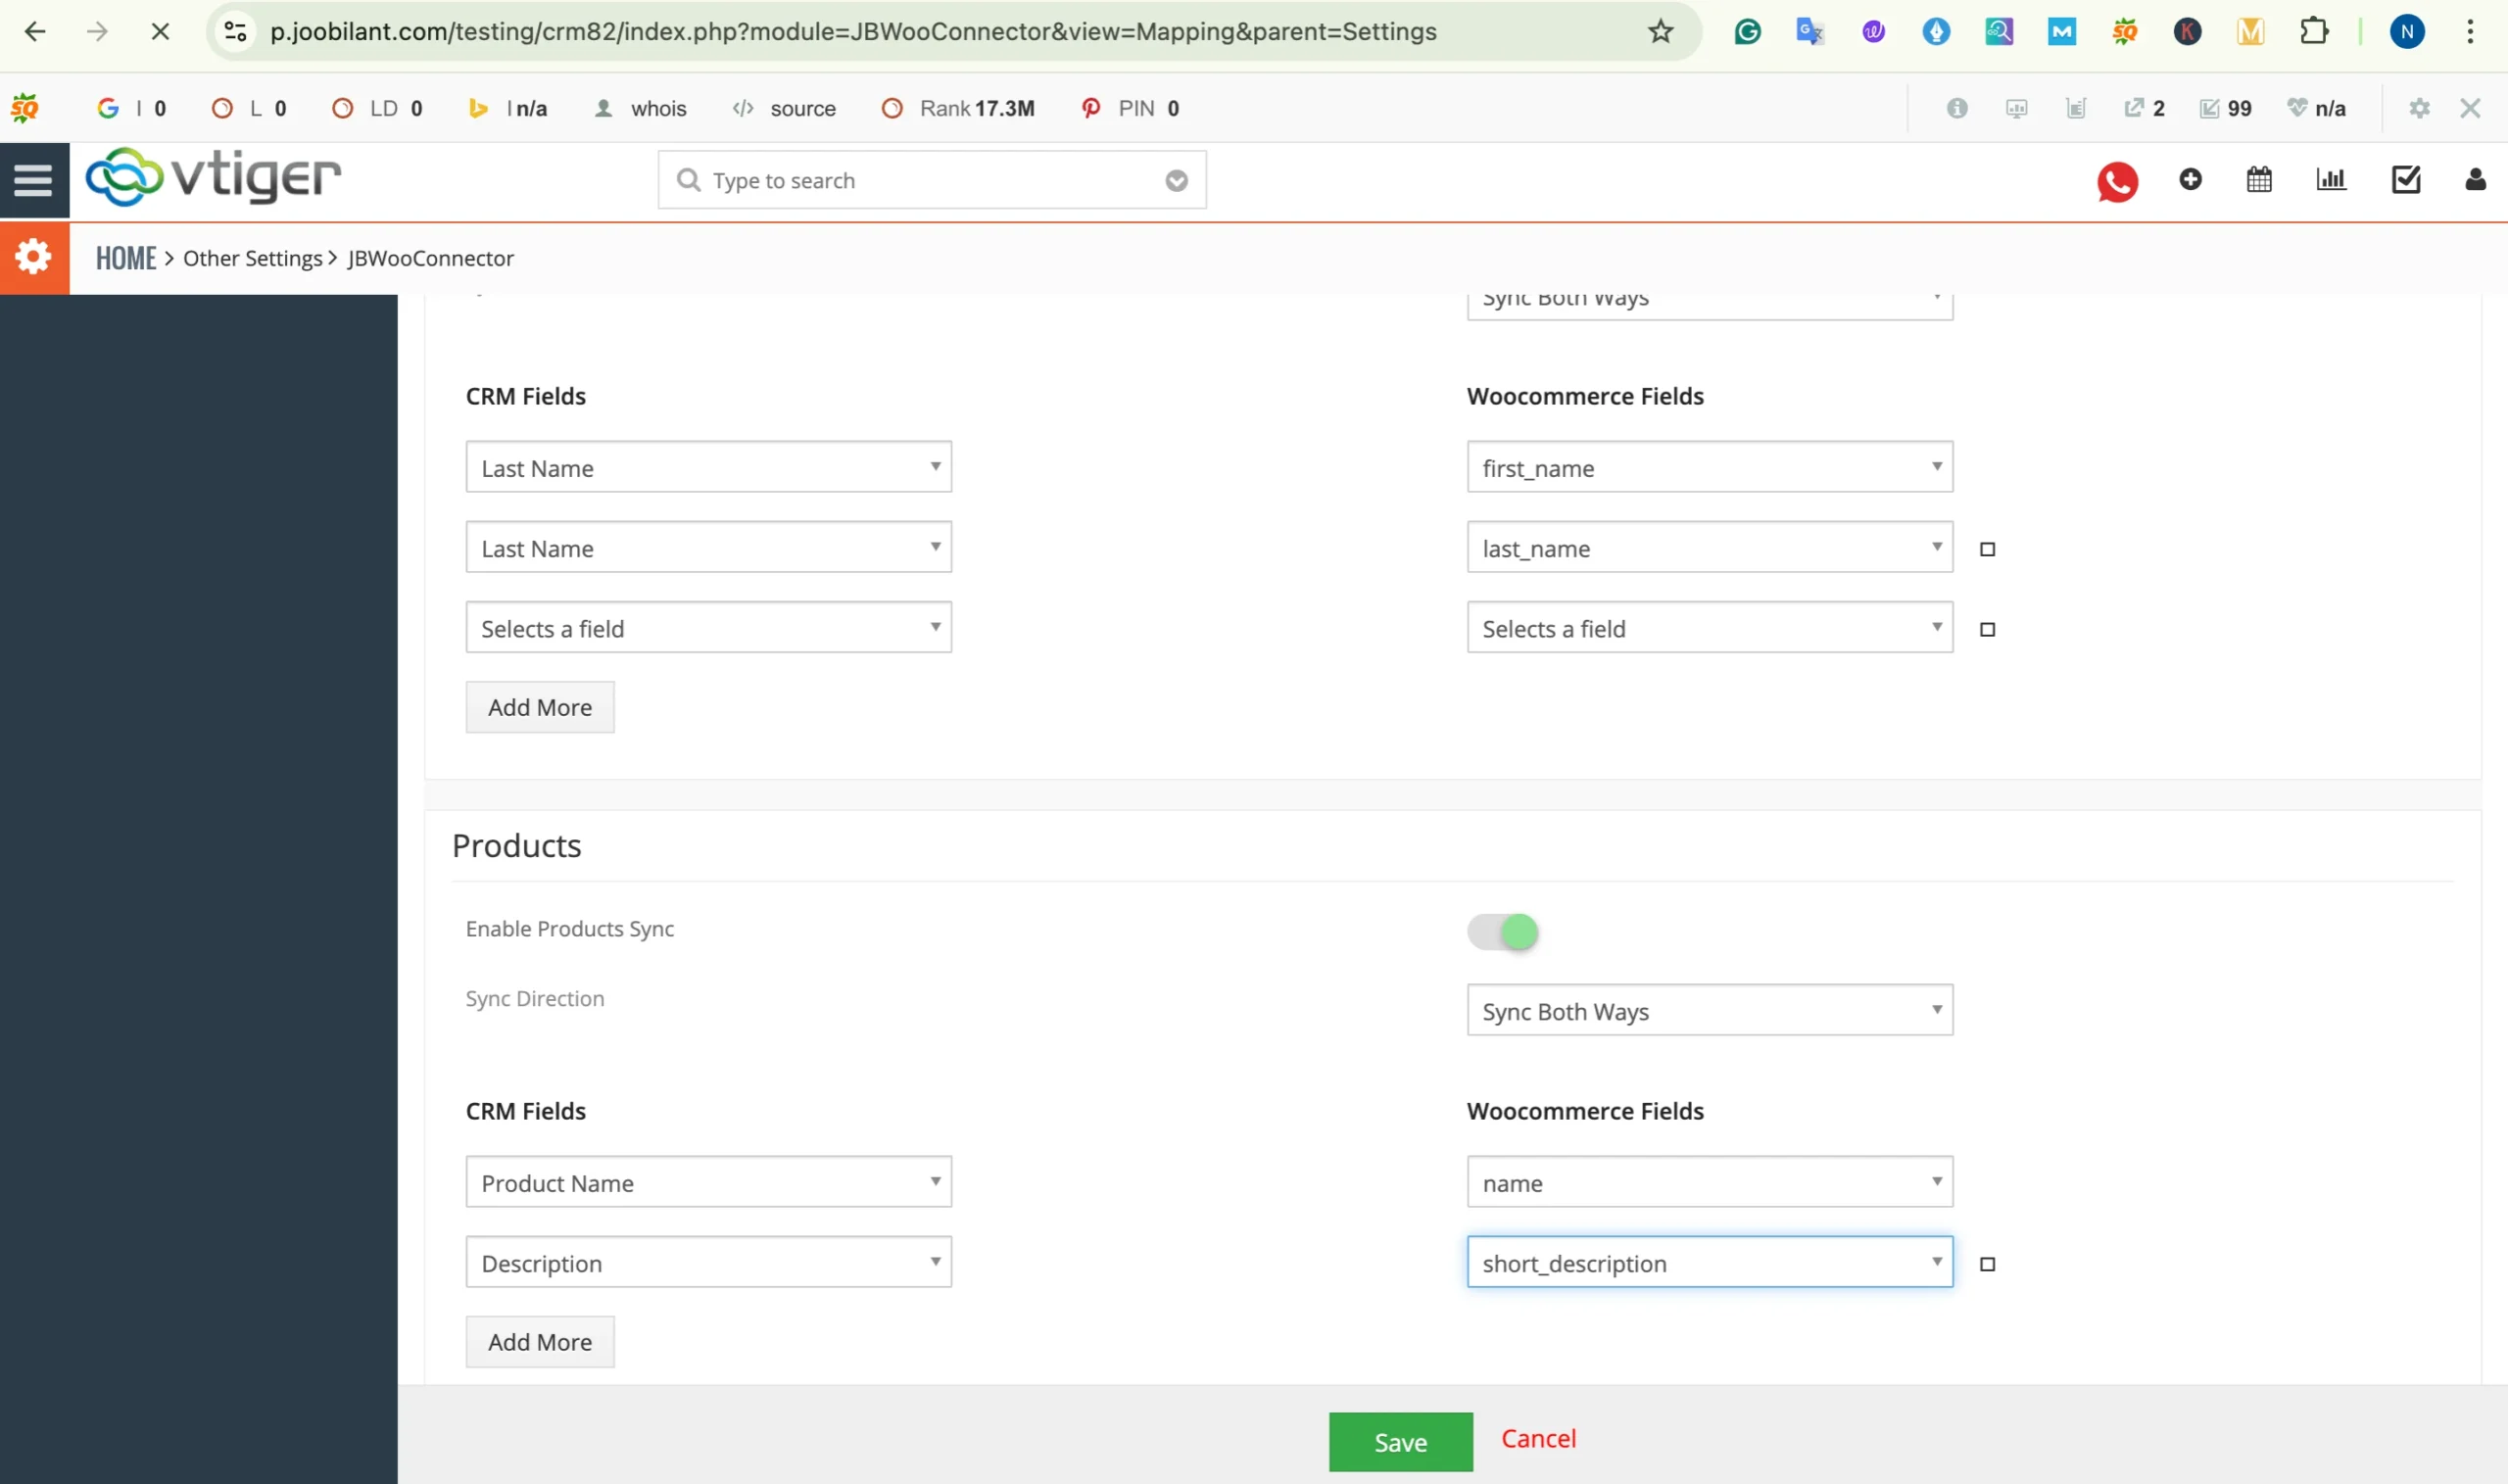
Step 5: Configure field mapping between WooCommerce and vtiger
Field mapping defines how data from WooCommerce corresponds to fields in vtiger crm
In the field mapping section:
- Select the relevant crm module
- Choose the corresponding WooCommerce field
- Map it to the appropriate vtiger crm field.
You will notice that some fields are already prefilled.
These are mandatory fields required to ensure successful data synchronization between WooCommerce and vtiger crm.
Mandatory fields must not be removed, as they are essential for accurate record creation and updates.
Carefully review all mapping to ensure your customer, order, and product data are structured correctly within vtiger crm.
Step 6: How the synchronisation works
To understand how the integration functions in a real-time scenario, let’s walk through a practical example.
Scenario 1: new customer order from WooCommerce to vtiger crm
- When a new sales order is confirmed in WooCommerce, the synchronization process is automatically triggered (based on your configured sync direction)
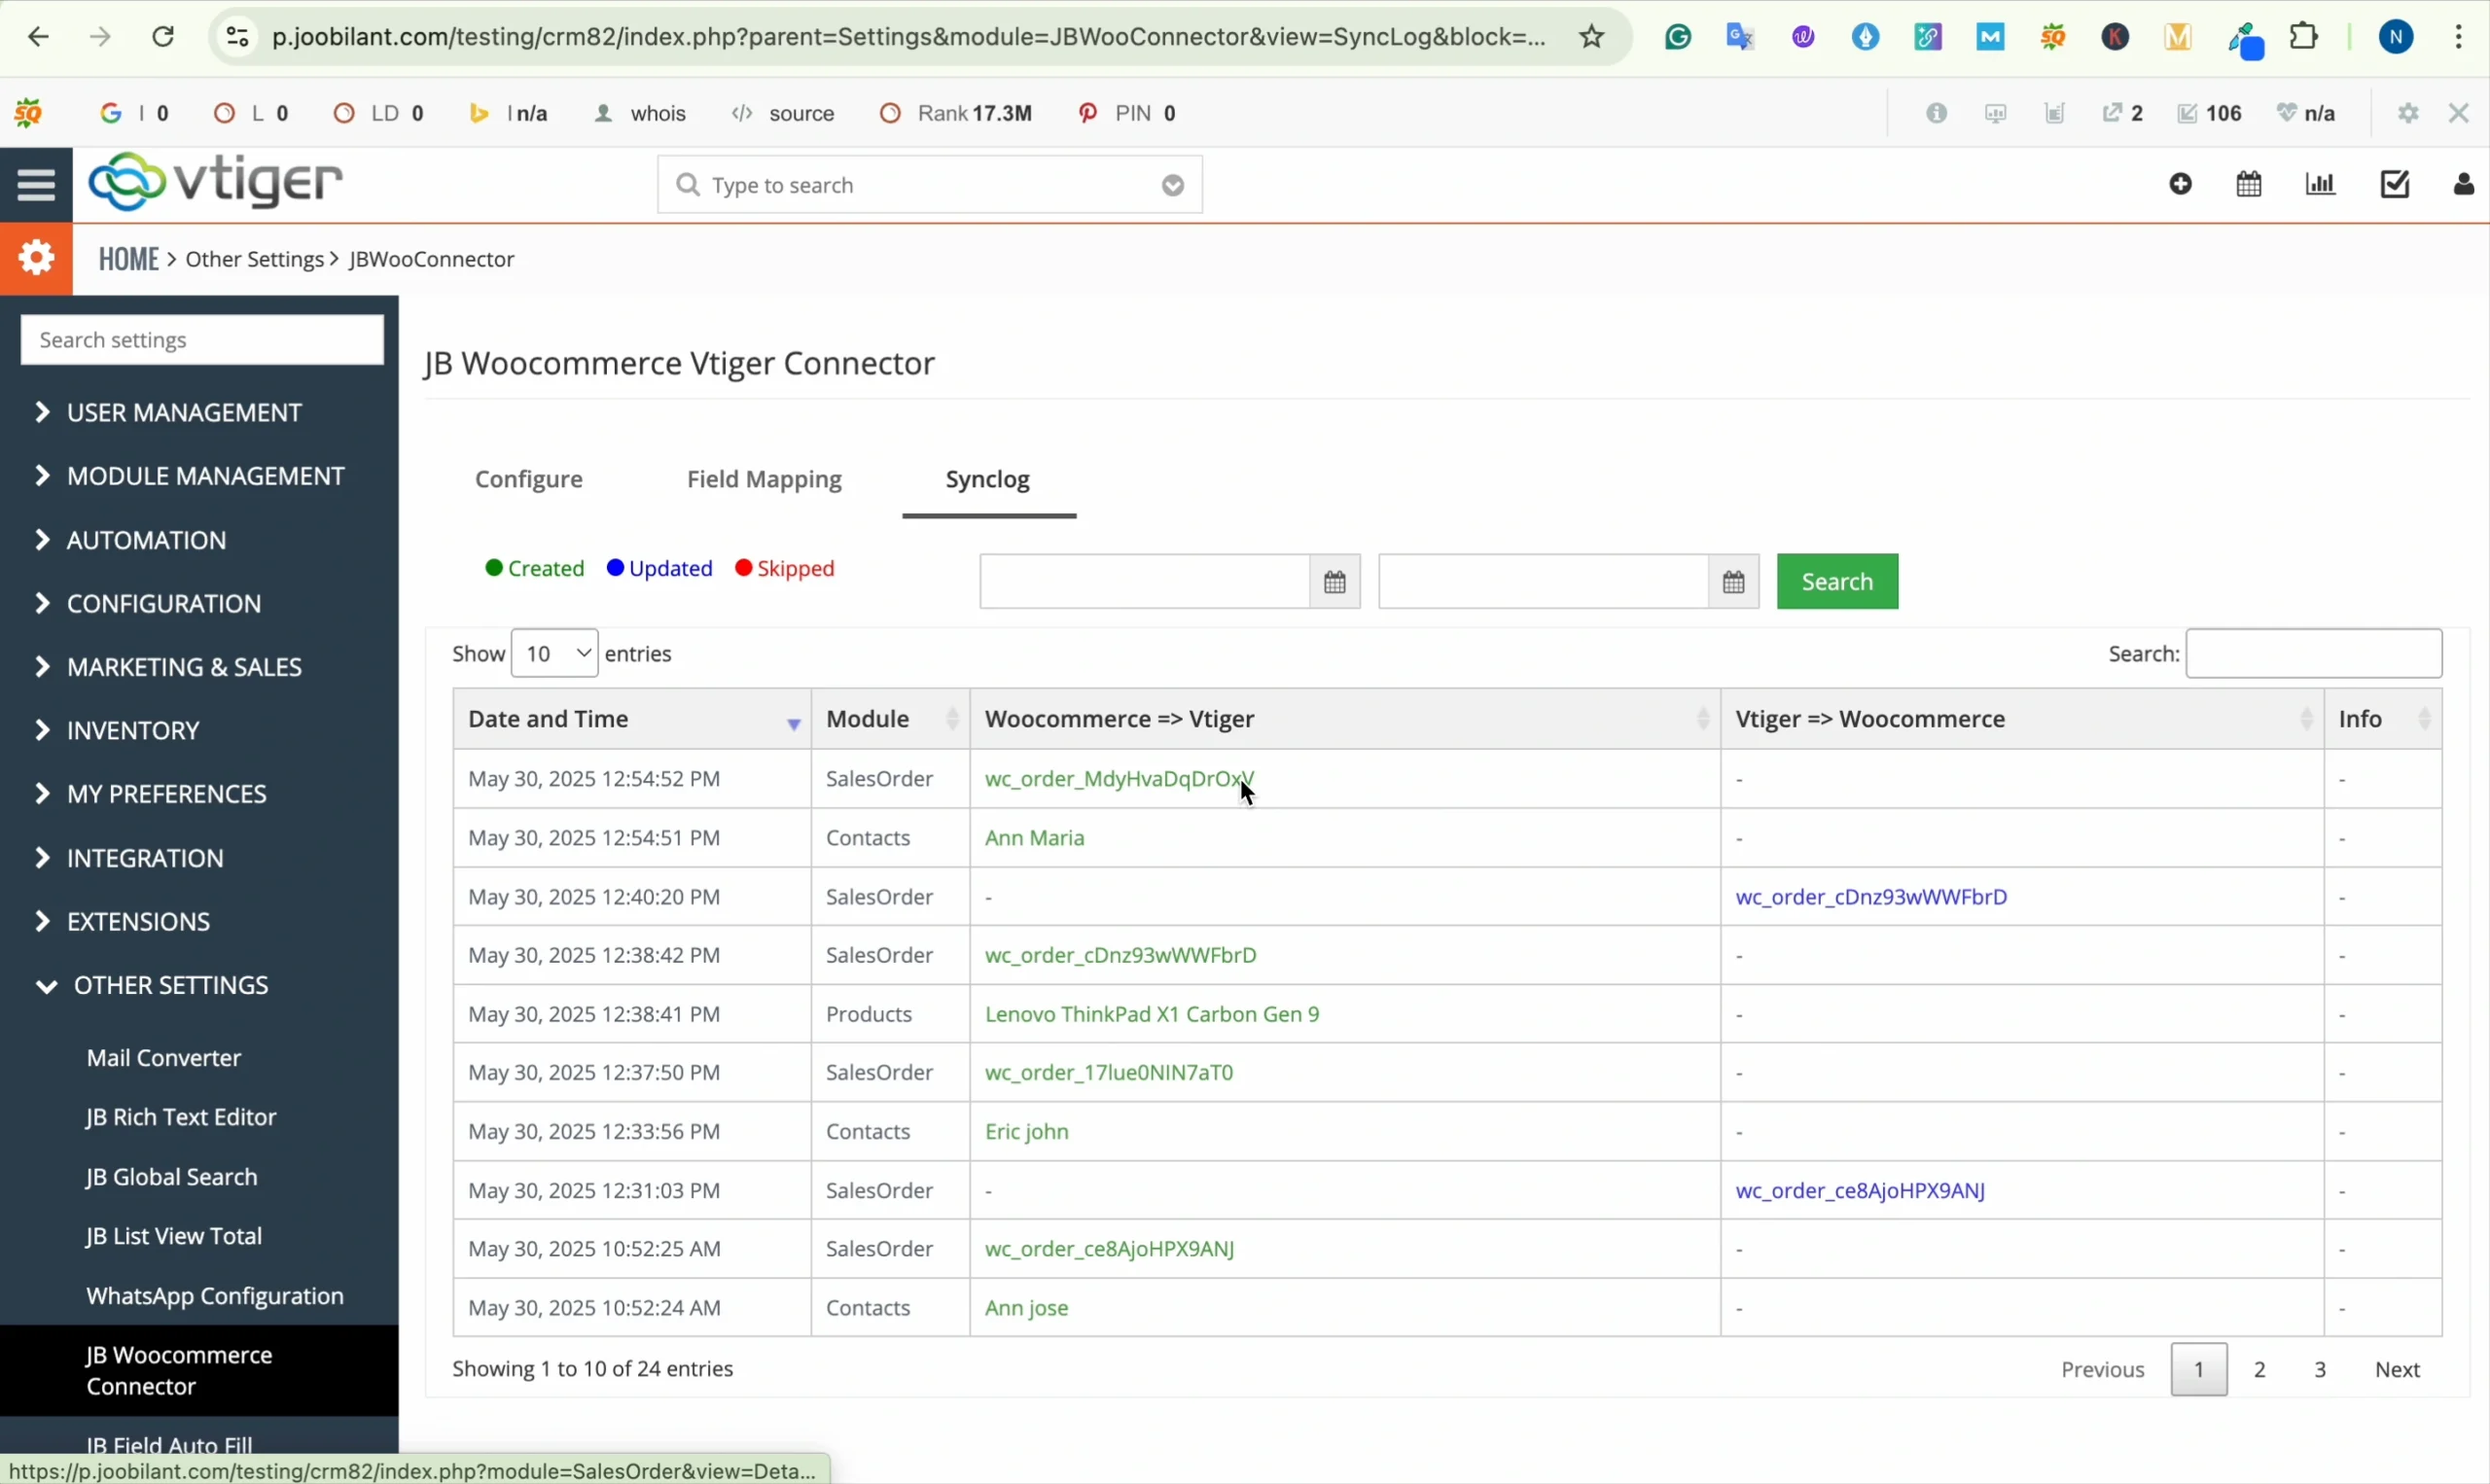
- Check the sync log in vtiger crm
Loginto vtiger crm
Navigate to: settings > crm settings > JB WooCommerce Connector> click on sync log
- Here you will see a new entry indicating that a sales order has been synchronized from WooCommerce.
Scenario 2: syncing a product from vtiger to WooCommerce
- Log in to your vtiger crm.
- Navigate to the product module
- Click add product
- Enter the required details such as:
- Product name
- Descriptions
- Pricing details
- Save product
Now :
- Go to the settings > crm settings > other settings > JB Woocommerce connector >
- Click on sync log.
You will see the newly created product listed in the sync log, indicating that ot has been successfully pushed to WooCommerce.
To verify :
- Log in to your WordPress dashboard
- Navigate to products or open your WooCommerce shop page.
The product created in vtiger crm should now be visible in WooCommerce.
Scenario 3: reflecting changes from WooCommerce to vtiger
Let’s test how updates are synchronised.
- Log in to your WordPress admin panel.
- Navigate to products
- Edit an existing product
- Click update.
Now:
- Log in to vtiger crm
- Navigate to JB Woocommerce connector > sync log.
You will see the update entry recorded, confirming that the product modification in WooCommerce has been synchronized back to vtiger crm (based on your configured sync direction).
Conclusion
WooCommerce Integration with Vtiger provides a centralized approach to managing e-commerce and crm data within a unified workflow. Through configurable field mapping, sync control, and visibility via sync logs, businesses can maintain data consistency between WooCommerce and vtiger crm without duplication or manual intervention. Once properly configured, the integration enures structures data alignment, improved record accuracy, and better coordination between sales and operations teams, strengthening your overall crm ecosystem.